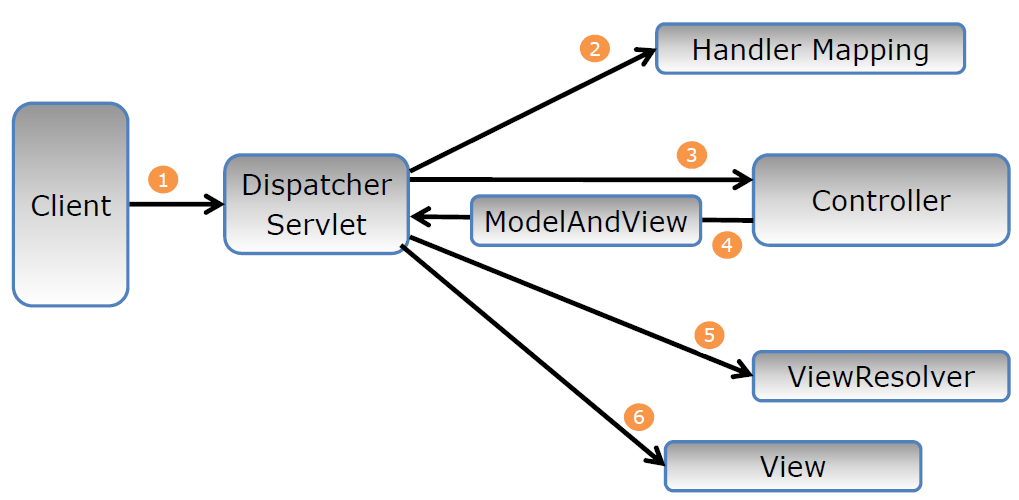
Controller는 스프링 MVC에서 서버분의 거의 대부분을 컨트롤 하는 부분이다.
스프링 Controller는 Client로부터 받은 요청을 어떻게 처리할지에 대한 정보들이 담겨있다.
예를들어 URL을 통해 페이지를 옮겨준다던지 모델과 연결하여 데이터베이스에 필요한 정보를 요청한다던지 하는 역할을 한다.
스프링MVC Controller의 특징을 보자
- HttpServletRequest, HttpServletResponse를 거의 사용하지 않고 필요한 기능 구현 가능하다.
- 다양한 타입의 파라미터처리, 다양한 타입의 리턴타입을 사용할 수 있다.
- GET방식, POST방식 등 전송 방식에 대한 처리를 어노테이션을 이용하여 처리할 수 있다.
- 상속/인터페이스 방식 대신에 어노테이션만으로도 필요한 설정을 할 수 있다.
|
1
2
3
4
5
6
7
8
9
10
11
12
13
14
15
16
17
18
19
20
|
@Controller
@RequestMapping("/sample/*")
@Log4j
public class SampleController {
@RequestMapping(value= "/basic",method = {RequestMethod.GET, RequestMethod.POST})
public void basicGet(){
log.info("basic..........................");
}
@GetMapping("/basicOnlyGet")
public void basicGet2(){
log.info("basic get only get...........");
}
@GetMapping("/ex01")
public String ex01(SampleDTO dto){
log.info(" "+ dto);
return "ex01";
}
|
cs |
- @Controller 어노테이션을 통해 Controller라는 것을 알려준다.
- @RequestMapping("/sample/*")
- sample/ 뒤에 들어가는 모든 것들을 이 컨트롤러에서 처리하겠다는 표시이다.
@RequestMapping(value = "/basic", method ={RequestMethod.GET/, RequestMethod.POST}
위 어노테이션은 /basic의 링크로 GET방식과 POST방식으로 통신하겠다는 뜻이다.
@GetMapping("/basic")
@PostMapping("/basic")
둘을 나누어서 쓰는것도 가능하다.
우선 Controller가 작동하기 위해서는 스프링 컨테이너에 Bean으로 등록이 되어야 하는데 ServletConfig.java파일에 Controller 클래스 파일의 위치를 추가하여 스프링 컨테이너가 빈을 생성할 수 있도록 설정해 주어야 한다.
ServletConfig.java
|
1
2
3
4
5
6
7
8
9
10
11
12
13
14
15
16
17
18
19
20
21
22
23
24
25
26
27
28
29
30
31
32
33
|
package org.onett.config;
@EnableWebMvc
@ComponentScan(basePackages = {"org.onett.controller"})
public class ServletConfig implements WebMvcConfigurer {
@Override
public void configureViewResolvers(ViewResolverRegistry registry) {
InternalResourceViewResolver bean = new InternalResourceViewResolver();
bean.setViewClass(JstlView.class);
bean.setPrefix("/WEB-INF/views/");
bean.setSuffix(".jsp");
registry.viewResolver(bean);
}
@Override
public void addResourceHandlers(ResourceHandlerRegistry registry){
registry.addResourceHandler("/resources/**").addResourceLocations("/resources/");
}
}
|
cs |
파라미터의 수집과 변환
@RequestParam("") 의 파라미터는 브라우저에서 요청하는 변수의 이름이다.
String name은 컨트롤러 내부에서 사용할 변수의 이름이다.
일반적으로 @RequestParam을 하지 않는다면 같은 변수의 이름에 값이 할당된다.
|
1
2
3
4
5
6
7
8
|
@GetMapping("/ex02")
public String ex02(@RequestParam("name") String name, @RequestParam("age") int age){
log.info("name : " + name);
log.info("age : " + age);
return "ex02";
}
|
cs |
브라우저 : https://localhost:8080/sample/ex02?name=AAA&age=10

|
1
2
3
4
5
6
7
|
@GetMapping("/ex02List")
public String ex02(@RequestParam("ids") ArrayList<String> ids){
log.info("ids : " + ids);
return "ex02List";
}
|
cs |
브라우저 : http://localhost:8181/sample/ex02List?ids=AAA&ids=123&ids=sakjdla

|
1
2
3
4
5
|
@GetMapping("/ex03")
public String ex03(TodoDTO dto){
log.info(dto);
return "ex03";
}
|
cs |
브라우저 : http://localhost:8181/sample/ex03?title=ajdklf&dueDate=2020/12/11
TodoDTO객체를 만들어서 객체를 파라미터로 받을 수 있다. get으로 요청할때 DTO객체 내부 변수의 이름과 GET으로 요청하는 변수의 이름이 같아야 된다.

위와같이 날짜를 출력하기 위해서는 데이터를 바인드 해야한다.
TodoDTO.java
|
1
2
3
4
5
6
7
8
9
10
11
12
13
14
15
16
17
|
package org.onett.domain;
import lombok.Data;
import org.springframework.format.annotation.DateTimeFormat;
import java.util.Date;
@Data
public class TodoDTO {
private String title;
@DateTimeFormat(pattern = "yyyy/MM/dd")
private Date dueDate;
}
|
cs |
@DataTimeFormat 어노테이션을 이용하여 Date 객체를 바인드 한다.
데이터 전달자 Model
Model을 사용하는 경우는 주로 Controller에 전달된 데이터를 이요해서 추가적인 데이터를 가져와야 하는 상황에 이용한다.(ex_ client로부터 받은 정보를 가공하여 다시 view로 전달해 줄때)
|
1
2
3
4
5
6
|
@GetMapping("/ex04")
public String ex04(SampleDTO dto, @ModelAttribute("page") int page){
log.info(dto);
log.info(page);
return "/sample/ex04";
}
|
cs |
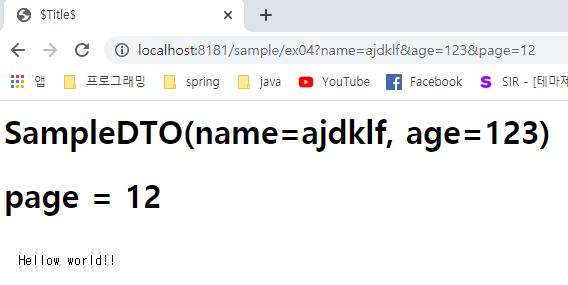
위 코드는 /sample/ex04로 데이터를 전달해 준다.
SampleDTO는 ModelAttribute에 담아서 전달하지 않아도 이미 스프링 컨테이너에 bean으로 등록 되어 있기 때문에 jsp파일에서 이용할 수 있다. 하지만 int page 변수는 Model객체에 담아서 jsp로 전달해 주어야 사용할 수 있다.
|
1
2
3
4
5
6
7
8
9
10
11
12
|
<%@ page contentType="text/html;charset=UTF-8" language="java" %>
<html>
<head>
<title>$Title$</title>
</head>
<body>
Hellow world!!
<h1>${sampleDTO}</h1>
<h1>page = ${page}</h1>
</body>
</html>
|
cs |
sample/ex04.jsp
@ResponseBody
|
1
2
3
4
5
|
<dependency>
<groupId>com.fasterxml.jackson.core</groupId>
<artifactId>jackson-databind</artifactId>
<version>2.9.5</version>
</dependency>
|
cs |
dependency를 추가해 준다.
|
1
2
3
4
5
6
7
8
9
|
@GetMapping("/ex06")
public @ResponseBody SampleDTO ex06(){
log.info("/ex06....................");
SampleDTO dto = new SampleDTO();
dto.setAge(10);
dto.setName("sex");
return dto;
}
|
cs |
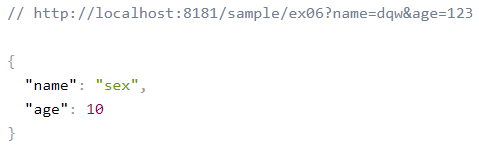
@ResponseBody의 역할은 return 값을 JSON데이터로 바인딩하여 전달해 주는 역할을 한다.
브라우저 : http://localhost:8181/sample/ex06?name=dqw&age=123
@ResponseEntity
ResponseBody와 비슷하지만 HttpHeader를 이용해서 추가적인 정보를 전달할 수 있다.
|
1
2
3
4
5
6
7
8
9
10
11
|
@GetMapping("/ex07")
public ResponseEntity<String> ex07(){
log.info("/ex07................");
String msg = "{\"name\" : \"홍길동\"}";
HttpHeaders header = new HttpHeaders();
header.add("Content-Type", "application/json;charset=UTF-8");
return new ResponseEntity<>(msg, header, HttpStatus.OK);
}
|
cs |
브라우저 : http://localhost/sample/ex07

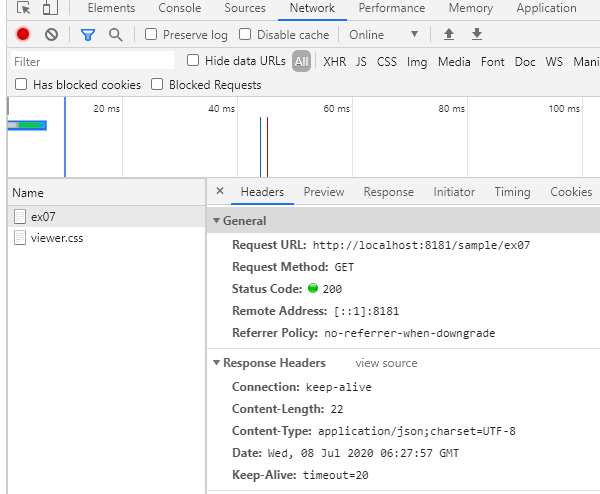
HttpHeaders header 에 대한 정보다 같이 잘 전달된 것을 확인할 수 있다.
'Spring > IntelliJ 설정' 카테고리의 다른 글
| [IntelliJ] 05 - 파일 업로드 설정 (0) | 2020.07.08 |
|---|---|
| [IntelliJ] 한글설정 (0) | 2020.07.08 |
| [IntelliJ] 03 - 인텔리제이 MyBatis 연동 (0) | 2020.07.06 |
| [IntelliJ] 02 - 인텔리제이 데이터베이스 연동 (0) | 2020.07.06 |
| [IntelliJ] 01 - 인텔리제이 환경설정 (0) | 2020.07.06 |


